Project: The value of raw
Exercise: Raw
Before I started the exercise, I calibrated the monitor on my computer.
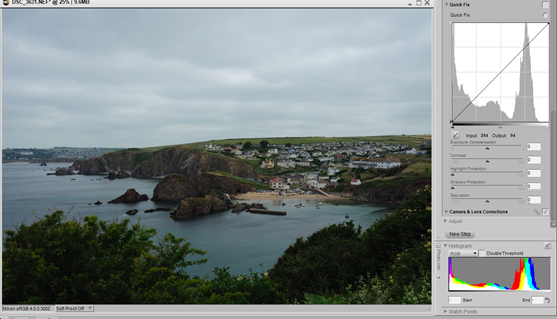
My first image was taken in daylight with the white balance set on direct sunlight - an oversight as the day had started that way. I thought it would be a good opportunity to see what RAW could offer in improving the image.
This is the RAW image before processing (Capture NX2):

…and after processing:

This result was achieved by the following adjustments:
- Pulled the right slider inwards to meet the edge of the histogram – lightening the image
- Applied +0.35 EV exposure adjustment
- Applied 29% on the Highlight protection slider to bring the white point in the sky to 248 from 255
- Applied 49% on the Shadow protection slider to lift the shadows to a black point of 5
JPEG processing
With the exception of the exposure compensation, the same tools were available to process the image:

To get a very similar result I applied these settings:
- Pulled the right slider inwards on levels and curves
- In place of the exposure compensation, I applied +7 to the contrast slider
- Applied 31% to the highlight protection slider to reduce the highlight to 247
- Applied 83% to the shadow protection slider to raise the black point to 2 only
My second image was taken in artificial light (a mix of flash and fluorescent) White balance was set to auto because of the mixture of light types and the programme/flash setting exposed for the lighter coloured wall. Here is the unprocessed RAW file:

……and the processed version.

This result was achieved by applying the following settings:
- I reset the white balance to flash which gave a warmer light
- Applied +1.5EV exposure compensation
- Applied 75% on the highlight protection slider which brought the clipped highlight on the ladder to 254 on the watch point value.
- I left the shadow protection at 0. the darkest point of the image at bottom left was 5 on the watch point value.
JPEG processing
There were some colour issues with this version but I suspect the Auto white balance setting has caused this.

This result was achieved using the following settings:
- I opened the colour balance slider and adjusted the the brightness to 100% to match the RAW version
- Applied +8% on the contrast slider
- Applied – 10% to the Red slider, +4% to the Green and –2 to the Blue to try match the tones of the RAW image.
- Watch point values for the highlight and shadows were 250 and 7 respectively. These fell within the range as a result of the increase in brightness.
The third image for this exercise is a high dynamic range photograph (i.e) high contrast where the pixel value goes from 2 up to 255
This is the RAW image before processing:

……..and the processed version:

I made the following changes to achieve this result:
- I applied –0.5 EV to the exposure to bring the right side of the histogram in a bit
- Applied 46% to the highlight protection slider
- Applied 95% to the shadow protection slide the lift the shadows
- The white balance setting for the camera was direct sunlight. It was a bit blue so I changed it to Shade and then changed the fine colour temperature setting from 8000 to 6293°K
JPEG processing (the JPEG is on the right)

Although the white balance wasn’t a problem with this image, the lost highlights in the sky couldn’t be recovered in the JPEG. Again, matching the colour was a bit problematic. I used these settings:
- Highlight protection slider 46%
- Shadow protection slider 95%
- Colour balance Green – 21%, Blue –48%
Conclusion
The principal differences between the pairs of images seems to be the colour, or a difficulty in matching the colour obtained in the RAW file after making adjustments for the white balance. The main difficulty with the JPEGs I chose for this exercise was colour but in the high contrast image the highlights were not recoverable. Processing RAW seems to be a faster and less complex technique than JPEGs.
No comments:
Post a Comment